Ah, chicken musubi! If you’re scouring the internet for a chicken musubi recipe that’s both delicious and easy to make, you’ve struck gold. This culinary masterpiece, a delightful twist on the classic Spam musubi, is about to become your new favorite. Whether you’re a seasoned chef or a kitchen novice, prepare to impress your taste buds and perhaps a friend or two. So, let’s dive into the world of musubi chicken, where flavor meets fun in a most delightful way.
Why Chicken Musubi?
Why not? Chicken musubi takes the traditional musubi to new heights with its tender, flavorful chicken in place of Spam. It’s a healthier option without sacrificing flavor. Perfect for picnics, lunches, or a quick snack, chicken musubi is as versatile as it is delicious. And let’s be honest, who doesn’t love a good chicken recipe? It’s the culinary equivalent of a Swiss Army knife—always the right choice.
The Chicken Musubi Recipe Breakdown
Before we embark on this culinary journey, let’s cover the basics. This recipe will guide you through the process of making the most delectable chicken musubi, infused with a hint of humor because cooking should always be a joy, not a chore.
- Servings: 4 people
- Prep Time: 20 minutes
- Cook Time: 10 minutes
- Total Time: 30 minutes
- Calories: Approximately 250 kcals per serving
Kitchen Equipment Needed:
- Rice cooker or pot
- Frying pan or skillet
- Musubi press (optional, but helpful)
- Sharp knife
- Mixing bowl
Ingredients for Chicken Musubi Recipe:
For the Chicken:
- 2 boneless, skinless chicken thighs, finely chopped
- 2 tablespoons soy sauce
- 1 tablespoon oyster sauce
- 1 teaspoon sesame oil
- 1 tablespoon brown sugar
- 1 clove garlic, minced
- 1 teaspoon grated ginger
For the Rice:
- 2 cups sushi rice
- 2 ½ cups water
- 1 tablespoon rice vinegar
- 1 teaspoon sugar
- ½ teaspoon salt
Additional:
- 4 sheets nori (seaweed)
- 1 tablespoon vegetable oil
- Furikake seasoning (optional)
Instructions:
Cook the Rice:
- Cold water should be used to rinse the sushi rice until the water runs clear.
- Combine the rice and water in a rice cooker and cook according to the manufacturer’s instructions. If using a pot, bring to a boil, then cover and simmer for 20 minutes or until water is absorbed.
- Mix rice vinegar, sugar, and salt in a small bowl until dissolved. Gently fold into the cooked rice. Set aside to cool.
Marinate the Chicken:
- In a mixing bowl, combine soy sauce, oyster sauce, sesame oil, brown sugar, minced garlic, and grated ginger. Add the chopped chicken thighs, ensuring they’re well-coated. Let marinate for at least 15 minutes.
Cook the Chicken:
- Put vegetable oil in a pan and heat it over medium-low heat. Add the marinated chicken and cook until browned and cooked through, about 7-8 minutes. Set aside.
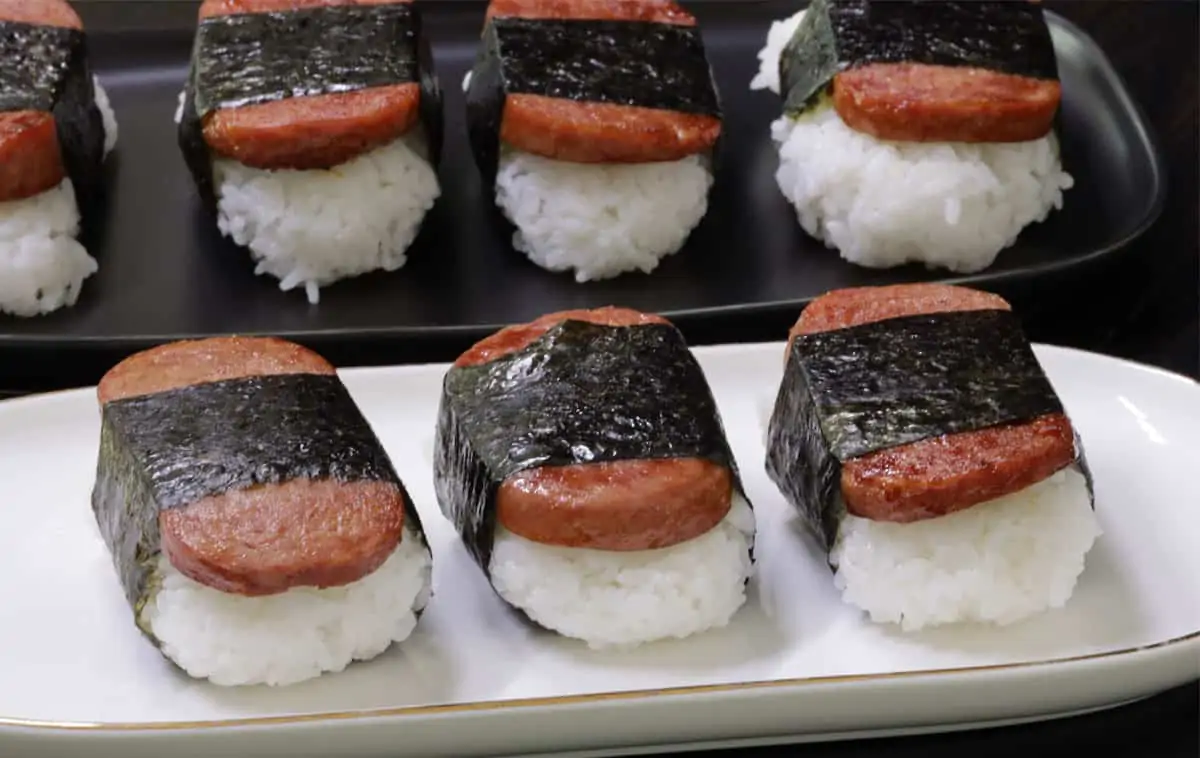
Assemble the Chicken Musubi:
- Cut the nori sheets in half. Place a half-sheet on a clean surface.
- Wet the musubi press (or your hands) and place it in the center of the nori. Add a layer of rice, pressing it down firmly.
- Sprinkle a bit of furikake seasoning over the rice for an extra flavor kick (optional).
- Spread the cooked chicken out evenly.
- Top with another layer of rice, pressing down firmly.
- Wrap the nori around the rice and chicken, using a bit of water to seal the edge.
- Remove from the press and repeat with the remaining ingredients.
Serve and Enjoy:
- Cut each musubi into halves or thirds, depending on preference.
- Serve immediately, or wrap in plastic wrap for a delicious on-the-go snack.
Tips for Perfect Chicken Musubi Recipe
- Rice Consistency: Getting the rice right is crucial. It should be sticky enough to hold together but not mushy.
- Seasoning: Don’t skimp on the marinating time for the chicken. Those 15 minutes (or more) make all the difference in flavor.
- Assembly: If you don’t have a musubi press, don’t panic. You can use the lid of a plastic container as a makeshift press.
FAQs about Chicken Musubi Recipe
1. Can I use chicken breast instead of thighs?
Yes, chicken breast can be used, but thighs tend to be juicier and more flavorful.
2. How long can chicken musubi be stored?
Wrapped tightly in plastic wrap, chicken musubi can be stored in the refrigerator for up to two days.
3. Is it necessary to use sushi rice?
Sushi rice is preferred for its sticky texture, which helps hold the musubi together. However, in a pinch, other short-grain rice varieties can be substituted.
4. Can I add other ingredients to my chicken musubi?
Absolutely! Feel free to customize your musubi with avocado, cucumber, or even a sprinkle of toasted sesame seeds.
5. Is there a vegetarian option for chicken musubi?
Yes, for a vegetarian version, replace the chicken with tofu or a vegetable patty and adjust the marinating ingredients as needed.
Conclusion
Wrapping up (pun intended), chicken musubi is more than just a snack; it’s a flavorful adventure that’s both satisfying and fun to make. Whether you’re a musubi aficionado or a curious newcomer, this chicken musubi recipe is sure to bring a smile to your face and a contented sigh from your stomach. So, why not give it a try? After all, in the realm of culinary creations, chicken musubi is a true gem, waiting to be discovered and devoured.
You might also like:
- Mar Far Chicken Recipe: A Deliciously Humorous Journey
- Triple Delight Chinese Food: Savor the Harmony
- Howard Johnson’s Chicken Croquettes Recipe: A Taste of History
- Crispy Chicken Fritta Recipe
- Puerto Rican Cuajito Recipe
- Creamy Pesto Shrimp Pasta Recipe

Chicken Musubi Recipe
Ingredients
For the Chicken:
- 2 boneless skinless chicken thighs, finely chopped
- 2 tablespoons soy sauce
- 1 tablespoon oyster sauce
- 1 teaspoon sesame oil
- 1 tablespoon brown sugar
- 1 clove garlic minced
- 1 teaspoon grated ginger
For the Rice:
- 2 cups sushi rice
- 2 ½ cups water
- 1 tablespoon rice vinegar
- 1 teaspoon sugar
- ½ teaspoon salt
Additional:
- 4 sheets nori seaweed
- 1 tablespoon vegetable oil
- Furikake seasoning optional
Instructions
Cook the Rice:
- Cold water should be used to rinse the sushi rice until the water runs clear.
- Combine the rice and water in a rice cooker and cook according to the manufacturer’s instructions. If using a pot, bring to a boil, then cover and simmer for 20 minutes or until water is absorbed.
- Mix rice vinegar, sugar, and salt in a small bowl until dissolved. Gently fold into the cooked rice. Set aside to cool.
Marinate the Chicken:
- In a mixing bowl, combine soy sauce, oyster sauce, sesame oil, brown sugar, minced garlic, and grated ginger. Add the chopped chicken thighs, ensuring they’re well-coated. Let marinate for at least 15 minutes.
Cook the Chicken:
- Put vegetable oil in a pan and heat it over medium-low heat. Add the marinated chicken and cook until browned and cooked through, about 7-8 minutes. Set aside.
Assemble the Chicken Musubi:
- Cut the nori sheets in half. Place a half-sheet on a clean surface.
- Wet the musubi press (or your hands) and place it in the center of the nori. Add a layer of rice, pressing it down firmly.
- Sprinkle a bit of furikake seasoning over the rice for an extra flavor kick (optional).
- Spread the cooked chicken out evenly.
- Top with another layer of rice, pressing down firmly.
- Wrap the nori around the rice and chicken, using a bit of water to seal the edge.
- Remove from the press and repeat with the remaining ingredients.
Serve and Enjoy:
- Cut each musubi into halves or thirds, depending on preference.
- Serve immediately, or wrap in plastic wrap for a delicious on-the-go snack.
Notes
- Rice Consistency: Getting the rice right is crucial. It should be sticky enough to hold together but not mushy.
- Seasoning: Don’t skimp on the marinating time for the chicken. Those 15 minutes (or more) make all the difference in flavor.
- Assembly: If you don’t have a musubi press, don’t panic. You can use the lid of a plastic container as a makeshift press.