Hello, dear readers! Today, we’re embarking on a culinary journey to recreate a classic treat that has graced many a wedding and tea party: the Keebler Danish Wedding Cookie recipe. Now, before you start worrying about having to crash a Danish wedding to get your hands on these delightful cookies, let me assure you, this guide will equip you with everything you need to whip up a batch from the comfort of your own kitchen. And let’s be honest, who wouldn’t want to bring a bit of matrimonial joy into their home with these scrumptious, buttery cookies, no wedding invitation required?
Introduction to the Keebler Danish Wedding Cookie Recipe
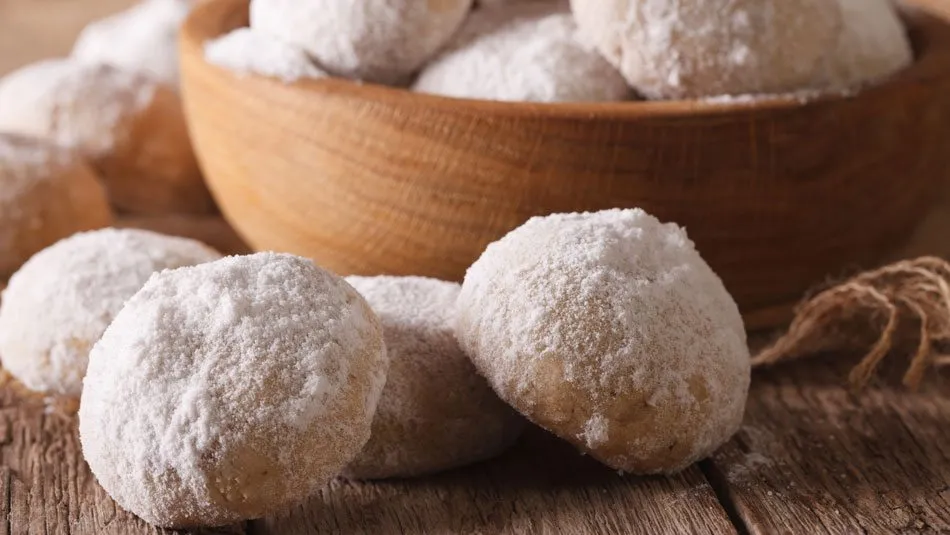
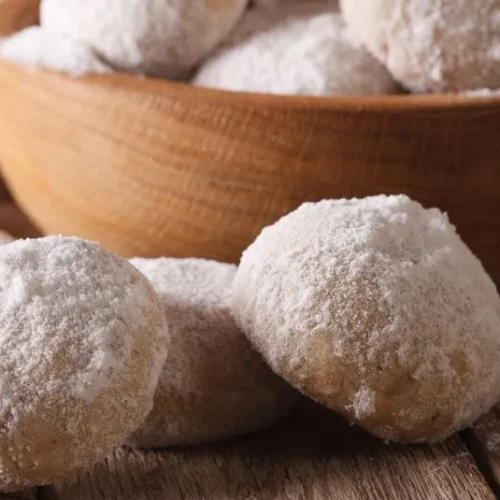
The Keebler Danish Wedding Cookie recipe is more than just a set of instructions; it’s a ticket to creating memories. Imagine a cookie so tender, so rich, and so covered in powdered sugar that you can’t help but feel a little more in love with every bite. Whether you’re a baking novice or an experienced confectioner, this recipe promises to sprinkle a little joy and a lot of flavor into your baking repertoire.
What Makes These Cookies Special?
It’s not just the name that makes these cookies stand out; it’s the delicate balance of ingredients, the melt-in-your-mouth texture, and the sweet dusting of powdered sugar that encapsulates the essence of celebration. Keebler Danish Wedding Cookies are a symbol of love and togetherness, making them perfect for any occasion, not just weddings.
Ingredients for Keebler Danish Wedding Cookie Recipe
Crafting the perfect Keebler Danish Wedding Cookie recipe requires a list of ingredients that blend together to create a cookie masterpiece. Here’s what you’ll need:
| Ingredient | Quantity |
|---|---|
| All-purpose flour | 2 cups |
| Unsalted butter, softened | 1 cup (2 sticks) |
| Powdered sugar | ½ cup (for dough) + more for dusting |
| Vanilla extract | 1 teaspoon |
| Almond extract | ½ teaspoon |
| Salt | ¼ teaspoon |
| Chopped nuts (optional) | ½ cup |
Equipment Needed
Before we dive into the baking process, let’s ensure you have all the necessary equipment on hand:
- Mixing bowls
- Electric mixer or stand mixer
- Measuring cups and spoons
- Baking sheet
- Parchment paper
- Wire rack (for cooling)
Recipe Details
- Prep Time: 15 minutes
- Cook Time: 10-12 minutes per batch
- Total Time: Approximately 1 hour
- Servings: Makes about 36 cookies
- Kcals per serving: Approx. 100 kcal (varies by size)
Step-by-Step Instructions
- Preheat the Oven: Set the oven’s temperature to 350°F (175°C). To make cleaning easier, line your baking sheet with parchment paper.
- Cream the Butter and Sugar: In a large mixing bowl, cream together the softened butter and ½ cup of powdered sugar until light and fluffy. Let the magic begin, everyone.
- Whisk in the Flavors: Add in the vanilla and almond extracts, blending until just combined. These extracts are the secret handshake of the Keebler Danish Wedding Cookie recipe, offering a nod to the cookie’s rich heritage.
- Combine the dry ingredients: Put the all-purpose flour and salt in a different bowl and mix them together with a whisk. Gradually add this to the butter mixture, beating on low speed until well incorporated. If you’re feeling nutty, fold in the chopped nuts at this stage.
- Shape the Cookies: Take small portions of the dough (about 1 tablespoon) and roll them into balls. Place them on the prepared baking sheet, spaced about 1 inch apart.
- Bake to Perfection: Bake in the preheated oven for 10-12 minutes, or until the cookies are set but not yet browned. They’re like undercover agents in a sea of heat, barely leaving a trace until they’re done.
- The Finished Touch: Before moving the cookies to a wire rack, let them cool on the baking sheet for around five minutes. Sprinkle them liberally with powdered sugar while they’re still warm. It’s like a snowfall of sweetness.
- Enjoy! After they’ve cooled, these cookies are ready to be eaten. Serve them with a side of love and a cup of tea or coffee for the ultimate experience.
Keebler Danish Wedding Cookie Recipe FAQs
- Can I make these cookies in advance?
Yes, these cookies store well in an airtight container at room temperature for up to a week, making them perfect for advance preparation. - Is it possible to freeze the dough?
Absolutely! Put the dough in plastic wrap and freeze it for up to three months. Let it thaw in the fridge before you shape and bake it. - Can I use different nuts in Keebler Danish Wedding Cookie Recipe?
Sure! While almonds or pecans are traditional, feel free to experiment with walnuts or hazelnuts for a twist. - What if I don’t have almond extract?
The almond extract adds a distinctive flavor, but if you’re out, just use an extra teaspoon of vanilla extract for a still-delicious cookie. - Why did my cookies flatten out?
This could be due to overly soft butter or overmixing the dough. Ensure your butter is softened but still slightly firm, and mix until just combined for the best texture.
Conclusion
Embarking on the journey to perfect the Keebler Danish Wedding Cookie recipe is more than just about baking; it’s about creating moments of joy, one cookie at a time. Whether for a wedding, a special occasion, or just because, these cookies are sure to bring a smile to anyone’s face. So, tie on your apron, preheat that oven, and get ready to bake your way into the hearts of all who are lucky enough to try these delightful treats. Happy baking, and may your kitchen always be filled with love and cookies!
You might also like:
1- Maggiano’s Gigi Butter Cake Recipe
2- Jason’s Deli Gingerbread Muffins Recipe
3- Del Frisco’s Butter Cake Recipe: The Ultimate Dessert Experience
4- Best Maple Nut Goodies Recipe: A Sweet Symphony in Your Mouth
Keebler Danish Wedding Cookie Recipe
Ingredients
- 2 cups All-purpose flour
- 1 cup 2 sticks Unsalted butter, softened
- ½ cup Powdered sugar for dough + more for dusting
- 1 teaspoon Vanilla extract
- ½ teaspoon Almond extract
- ¼ teaspoon Salt
- ½ cup Chopped nuts optional
Instructions
- Preheat the Oven: Set the oven’s temperature to 350°F (175°C). To make cleaning easier, line your baking sheet with parchment paper.
- Cream the Butter and Sugar: In a large mixing bowl, cream together the softened butter and ½ cup of powdered sugar until light and fluffy. Let the magic begin, everyone.
- Whisk in the Flavors: Add in the vanilla and almond extracts, blending until just combined. These extracts are the secret handshake of the Keebler Danish Wedding Cookie recipe, offering a nod to the cookie’s rich heritage.
- Combine the dry ingredients: Put the all-purpose flour and salt in a different bowl and mix them together with a whisk. Gradually add this to the butter mixture, beating on low speed until well incorporated. If you’re feeling nutty, fold in the chopped nuts at this stage.
- Shape the Cookies: Take small portions of the dough (about 1 tablespoon) and roll them into balls. Place them on the prepared baking sheet, spaced about 1 inch apart.
- Bake to Perfection: Bake in the preheated oven for 10-12 minutes, or until the cookies are set but not yet browned. They’re like undercover agents in a sea of heat, barely leaving a trace until they’re done.
- The Finished Touch: Before moving the cookies to a wire rack, let them cool on the baking sheet for around five minutes. Sprinkle them liberally with powdered sugar while they’re still warm. It’s like a snowfall of sweetness.
- Enjoy! After they’ve cooled, these cookies are ready to be eaten. Serve them with a side of love and a cup of tea or coffee for the ultimate experience.